

Replace bogey wheels on a Snowdog
Many Snowdog owners love the bogey wheels on their machines because they make it possible to use the machine all year long. They provide a stable, adaptive suspension that travels easily over ice, snow, dirt, gravel and so much more. Like any other component on a machine, they sometimes need to be replaced, and we wanted to show you how easy it is to replace bogey wheels on a Snowdog.
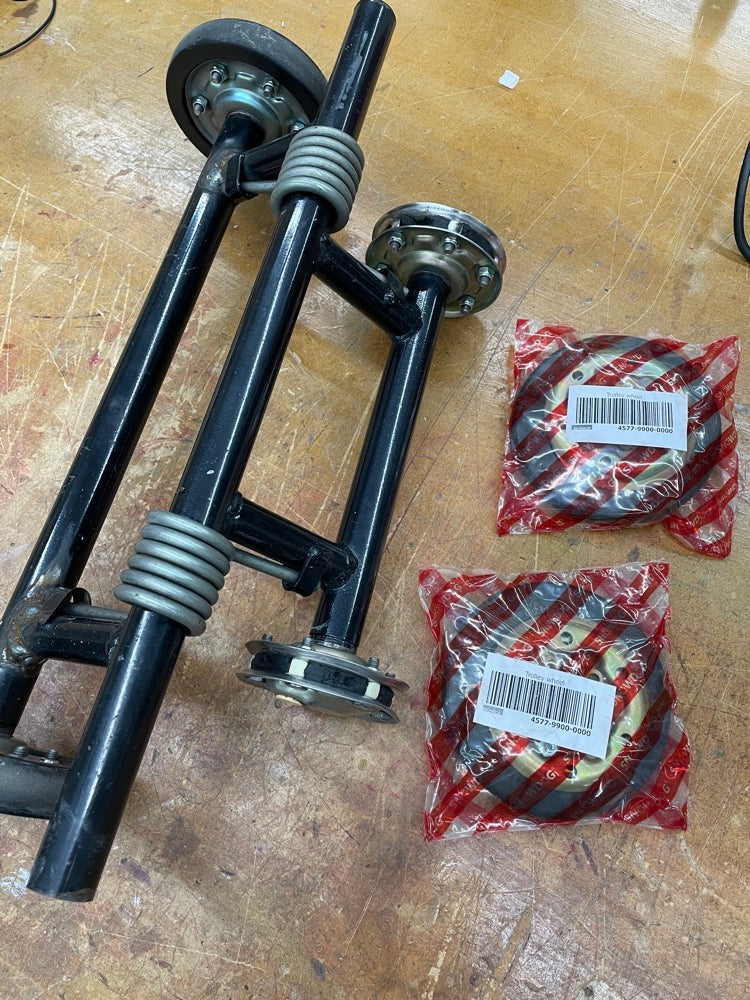
In this example, we're simply replacing the rubber of the bogey wheels, not the bearing. In many cases, it's wise to replace the bearing at the same time, but since the bearings were in good shape and we were only changing two wheels, we left the bearings alone.
Let's begin!
Step 1: Take a load off
While it's entirely possible to do this job without taking the whole trolley assembly out, we took it out just because it makes the wheel replacement much easier. The first thing you'll need to do is to take the pressure off the trolley. You can do this by propping up one end of the snowdog, or by lifting it off the tracks. We're fortunate to have a forklift in our shop, so we used that. However you choose to lift your snowdog off the ground or prop it up, do it safely!

Step 2: Remove the Trolley
Next, we used a 14mm wrench to remove the two bolts holding the trolley in place. You could use an impact drill to do this if you have one, but as you can see, we did just fine without it.

Once the two mounting bolts are removed, the trolley can be removed from underneath the Snowdog.

Step 3: Take Apart the Bogey Wheel
Using two 10mm wrenches (one on the bolt end, one on the nut), remove all six of the bolts holding the hub in place. The bogey wheel is essentially a rubber donut held in place by the hub. With the outside hub removed (along with the damaged rubber) you can see the bearing here. It looks a little grungy, but it actually spins very nicely, which is why we didn't replace them.
If we were going to replace the bearings, we'd need to remove the c-clip holding it in place, and then a bearing puller to remove the bearing assembly. It's a tight fit, and a bearing puller tool is handy for this job.

Step 4: Installing the new Rubber Wheel
There are some little plastic spacers in the kit that came with the bogey wheels, and we used those even though there were little black spacers in the wheel already. Just pop out the black spacers, and replace them with the new ones.
It's possible that the new spacers are slightly longer than the black ones, and are designed to prevent over-tightening of the hub on the bearing. Honestly, we're not sure that's true, but we used them anyway.

Next, place the rubber wheel on the hub (it fits snugly around the bearing housing), and re-attach the outside hub with the bolts and lock washers. Make sure to install the little rubber plug that comes with the kit, which will help to prevent water and debris from getting into the hub.
Step 5: Re-Install the Trolley Assembly

Slip the trolley back into position and reinstall the 14mm bolts. Remember how tight it was when you took it off? It should be that tight again. Careful not to strip the threads or over-tighten with your impact drill!
On a related note: if you have a history of over-tightening fasteners, you may be interested in our Complete Fastener Kit, which contains a wide range of replacements!
Step 6: Celebrate!
Thanks for reading! If you have any tips, tricks or hacks that would make this job easier than we've explained it, or if you'd like to see other how-to manuals, we'd love to hear from you! Use our contact form to reach us!
